เจาะลึกการจำลอง UART ด้วย STM32 ตอนที่ 2: การส่งข้อมูล
Implementing a Software UART on STM32
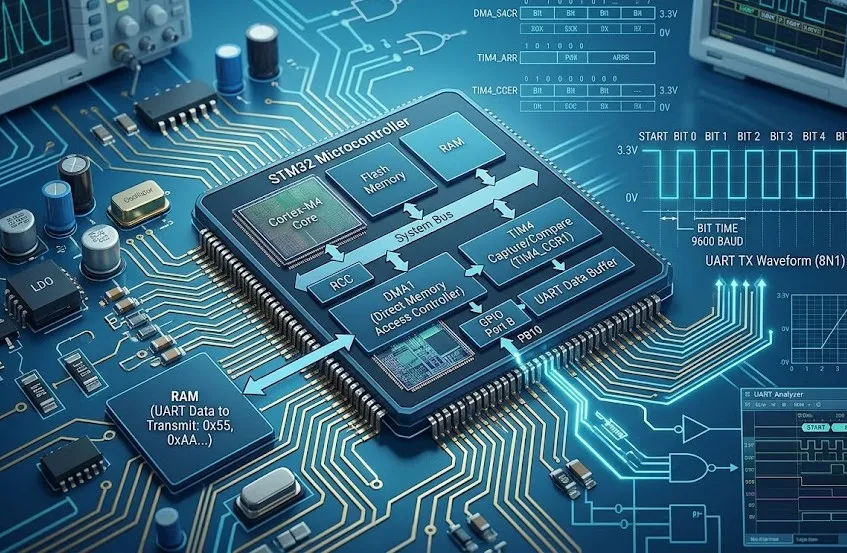
เมื่อการตั้งค่า Timer และ GPIO เสร็จสมบูรณ์แล้ว ขั้นตอนต่อไปคือการพัฒนาในส่วนของการส่งข้อมูล โดยใช้ Interrupt จาก TIM3 เป็นกลไกหลักในการควบคุมการส่งข้อมูล
เมื่อเกิด Interrupt ไมโครคอนโทรลเลอร์จะทยอยส่งบิตข้อมูลออกทางขา TX โดยอัตโนมัติ ทำให้สามารถสร้าง Baud Rate ได้อย่างแม่นยำ และที่สำคัญคือไม่รบกวนการทำงานของ Main Loop ที่ยังสามารถทำงานต่อได้ตามปกติ
ในบทความนี้ เราจะกล่าวถึงหัวข้อสำคัญดังต่อไปนี้
- การพัฒนาเฟิร์มแวร์ (Firmware Development)
- ผลการทดสอบ (Results)
1. การพัฒนา Firmware (Firmware Development)
เริ่มต้นด้วยการสร้างไฟล์ Header และ Source ขึ้นมาใหม่ โดยตั้งชื่อไฟล์เป็น soft_uart.h และ soft_uart.c ตามลำดับ
สำหรับการสร้าง Header File ให้คลิกขวาที่โฟลเดอร์ inc จากนั้นเลือก New → Header File ตามขั้นตอนดังรูปที่ 1
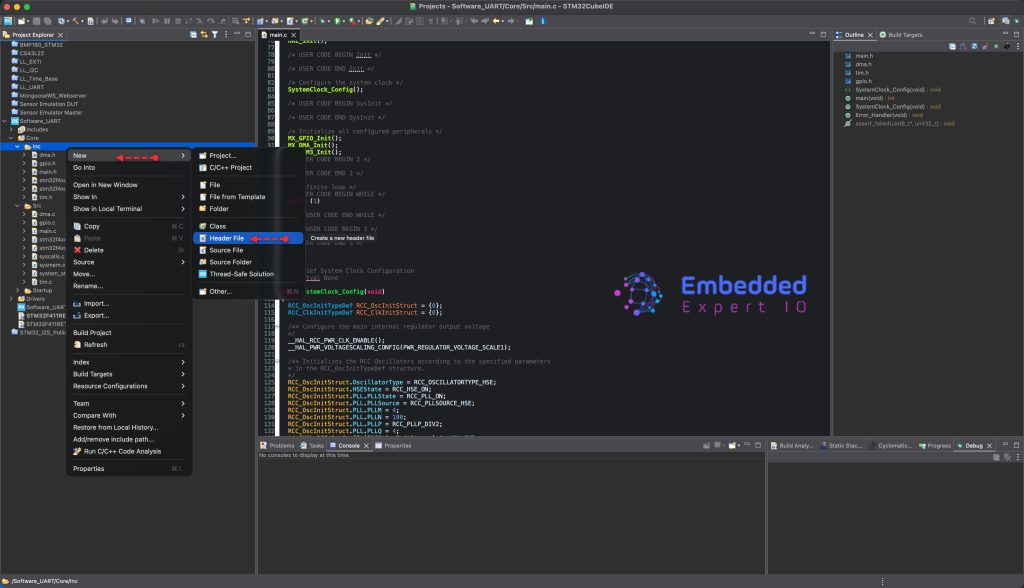
ตั้งชื่อไฟล์ว่า soft_uart.h จากนั้นคลิก Finish
สำหรับการสร้าง Source File ให้คลิกขวาที่โฟลเดอร์ src จากนั้นเลือก New → Source File และ ตั้งชื่อไฟล์ว่า soft_uart.c จากนั้นคลิก Finishตาตามขั้นตอนดังรูปที่ 2
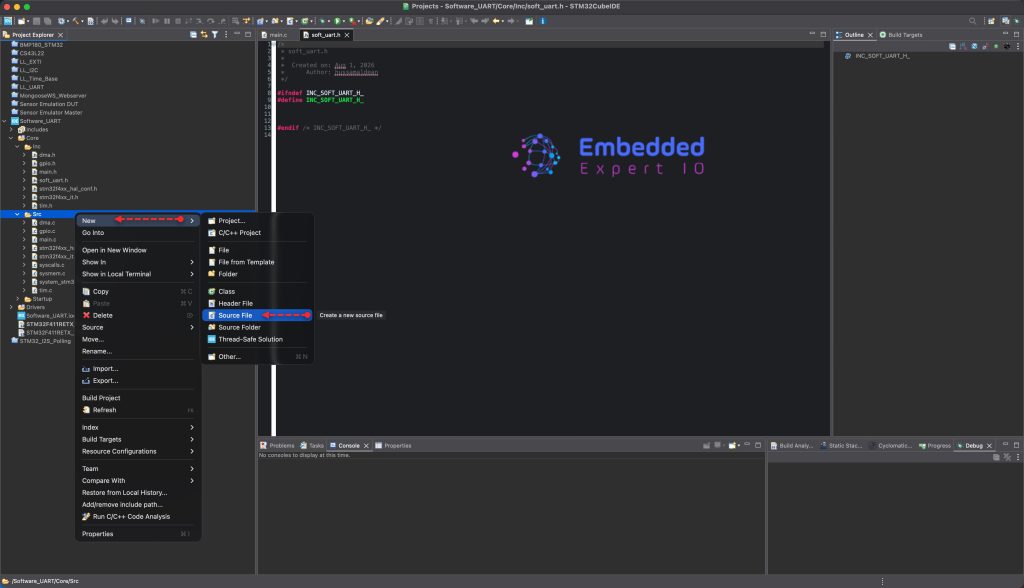
soft_uart.h
ให้เปิดไฟล์ Header File ที่ชื่อ soft_uart.h
เริ่มต้นด้วยการ Include stm32g4xx_hal.h ซึ่งเป็น Header File หลักของ STM32G4 พร้อมกับ tim.h สำหรับใช้งาน Timer
นอกจากนี้ ยัง Include stdint.h และ stdbool.h เพื่อรองรับการใช้งานชนิดข้อมูล uint และ bool ตามลำดับ
#include "stm32f4xx_hal.h"
#include <stdint.h>
#include <stdbool.h>
#include "tim.h"
และให้กำหนดค่า Baud Rate และ timer frequency ดังนี้
#define SOFT_UART_BAUDRATE         115200U
#define SOFT_UART_TIM_CLOCK_HZ     100000000UL
คำนวณจำนวน Ticks ต่อ 1 บิต สำหรับ UART หมายเหตุ ค่านี้สามารถปรับเปลี่ยนได้ในภายหลัง หากต้องการใช้งาน Baud Rate เช่น 9600 bps
#define SOFT_UART_TICKS_PER_BIT \
    ((SOFT_UART_TIM_CLOCK_HZ + (SOFT_UART_BAUDRATE / 2U)) / SOFT_UART_BAUDRATE)
อธิบายเพิ่มเติม
กำหนดจำนวน Timer Tick ต่อ 1 Bit โดยคำนวณจากความถี่ของ Timer Clock และ Baud Rate ที่กำหนด
สูตรที่ #define ใช้คือ
จากนั้นให้กำหนดขนาดของ TX Buffer ซึ่งสามารถปรับเปลี่ยนได้ตามลักษณะการใช้งานของแต่ละ Application
#define SOFT_UART_TX_BUF_SIZE 128Uให้ Define ฟังก์ชันที่ใช้สำหรับเริ่มต้นการทำงานของ Soft UART
void SoftUART_Init(void);ฟังก์ชันนี้ช่วยให้สามารถส่งข้อมูลขนาด 1 Byte ผ่าน Soft UART ได้
void SoftUART_SendByte(uint8_t data);ฟังก์ชันนี้ใช้สำหรับส่งข้อมูลจาก Buffer
void SoftUART_SendBuffer(const uint8_t *data, uint32_t len);ฟังก์ชันนี้ใช้สำหรับส่งข้อมูลประเภท String
void SoftUART_SendString(const char *str);ฟังก์ชันนี้ใช้สำหรับตรวจสอบสถานะการส่งข้อมูลของ UART ว่ายังอยู่ระหว่างการส่งข้อมูล หรือส่งข้อมูลครบทุก Byte แล้ว
bool SoftUART_IsBusy(void);Header File ทั้งหมดของ soft_uart.h
/* soft_uart.h — Software UART via TIM3 Interrupt */
#ifndef SOFT_UART_H
#define SOFT_UART_H

#include "stm32f4xx_hal.h"
#include <stdint.h>
#include <stdbool.h>
#include "tim.h"
/* ===================== User Configuration ===================== */

#define SOFT_UART_BAUDRATE         115200U
#define SOFT_UART_TIM_CLOCK_HZ     100000000UL

/* Timer ticks per UART bit */
#define SOFT_UART_TICKS_PER_BIT \
    ((SOFT_UART_TIM_CLOCK_HZ + (SOFT_UART_BAUDRATE / 2U)) / SOFT_UART_BAUDRATE)

/* TX Buffer Size */
#define SOFT_UART_TX_BUF_SIZE      128U

/* ===================== API ===================== */

void  SoftUART_Init(void);
void  SoftUART_SendByte(uint8_t data);
void  SoftUART_SendBuffer(const uint8_t *data, uint32_t len);
void  SoftUART_SendString(const char *str);
bool  SoftUART_IsBusy(void);

#endif /* SOFT_UART_H */
soft_uart.c
ให้เปิด Source File ที่ชื่อ soft_uart.c
เริ่มต้นด้วยการ Include Header File ที่จำเป็นดังนี้
#include "soft_uart.h"
#include "main.h"
ประกาศตัวแปร Private ดังต่อไปนี้
static volatile uint8_t  tx_buffer[SOFT_UART_TX_BUF_SIZE];
static volatile uint16_t tx_head = 0;  /* Where new data is added */
static volatile uint16_t tx_tail = 0;  /* What the ISR is currently sending */

static volatile uint8_t  tx_shift_reg = 0;
static volatile uint8_t  tx_bit_count = 0;
static volatile bool     tx_busy = false;
สำหรับการเริ่มต้น Soft UART ให้กำหนดขา TX ให้อยู่ในสถานะ High ซึ่งเป็นสถานะ Idle ของ UART ก่อนเริ่มส่งข้อมูล ดังนี้
void SoftUART_Init(void)
{
    /* Ensure PA6 is High (Idle state) */
    HAL_GPIO_WritePin(soft_tx_GPIO_Port, soft_tx_Pin, GPIO_PIN_SET);
}
Code การทำงานของฟังก์ชัน SoftUART_SendByte()
void SoftUART_SendByte(uint8_t data)
{
    /* Calculate next head index */
    uint16_t next_head = (tx_head + 1U) % SOFT_UART_TX_BUF_SIZE;

    /* Wait if buffer is full */
    while (next_head == tx_tail) { __WFE(); }

    /* Disable interrupt temporarily to safely update the buffer */
    __disable_irq();
    tx_buffer[tx_head] = data;
    tx_head = next_head;
    __enable_irq();

    /* Start the timer if it's not already running */
    if (!tx_busy)
    {
        tx_busy = true;
        htim3.Instance->CNT = 0;
        HAL_TIM_Base_Start_IT(&htim3);
    }
}
Code การทำงานของฟังก์ชัน SoftUART_SendBuffer()
void SoftUART_SendBuffer(const uint8_t *data, uint32_t len)
{
    for (uint32_t i = 0; i < len; i++)
    {
        SoftUART_SendByte(data[i]);
    }
}

void SoftUART_SendString(const char *str)
{
    while (*str)
    {
        SoftUART_SendByte((uint8_t)*str++);
    }
}
ฟังก์ชันนี้ใช้สำหรับตรวจสอบสถานะของ Soft UART ว่ากำลังส่งข้อมูลอยู่หรือส่งข้อมูลเสร็จเรียบร้อยแล้ว โดยคืนค่า
tx_busy เพื่อแจ้งสถานะการส่งข้อมูล
bool SoftUART_IsBusy(void)
{
    return tx_busy;
}
นี่ส่วนของการทำงาน TIM3 Interrupt Handler ซึ่งทำหน้าที่ควบคุมการส่งข้อมูลของ Soft UART ในแต่ละบิต
void TIM3_IRQHandler(void)
{
    /* Clear the update interrupt flag manually (bypass HAL overhead) */
    TIM3->SR = ~TIM_SR_UIF;

    if (tx_bit_count == 0)
    {
        /* Load next byte from the ring buffer */
        if (tx_head != tx_tail)
        {
            tx_shift_reg = tx_buffer[tx_tail];
            tx_tail = (tx_tail + 1U) % SOFT_UART_TX_BUF_SIZE;

            /* Send Start Bit (Low) */
            HAL_GPIO_WritePin(soft_tx_GPIO_Port, soft_tx_Pin, GPIO_PIN_RESET);

            tx_bit_count = 1; /* Start processing data bits on next interrupt */
        }
        else
        {
            /* Buffer empty: Stop the timer */
            HAL_TIM_Base_Stop_IT(&htim3);
            tx_busy = false;
        }
    }
    else if (tx_bit_count <= 8)
    {
        /* Send Data Bits (LSB first) */
        if (tx_shift_reg & 0x01U)
        {
            HAL_GPIO_WritePin(soft_tx_GPIO_Port, soft_tx_Pin, GPIO_PIN_SET);
        }
        else
        {
            HAL_GPIO_WritePin(soft_tx_GPIO_Port, soft_tx_Pin, GPIO_PIN_RESET);
        }

        tx_shift_reg >>= 1;
        tx_bit_count++;
    }
    else
    {
        /* Send Stop Bit (High) */
        HAL_GPIO_WritePin(soft_tx_GPIO_Port, soft_tx_Pin, GPIO_PIN_SET);
        tx_bit_count = 0; /* Reset for next byte */
    }
}
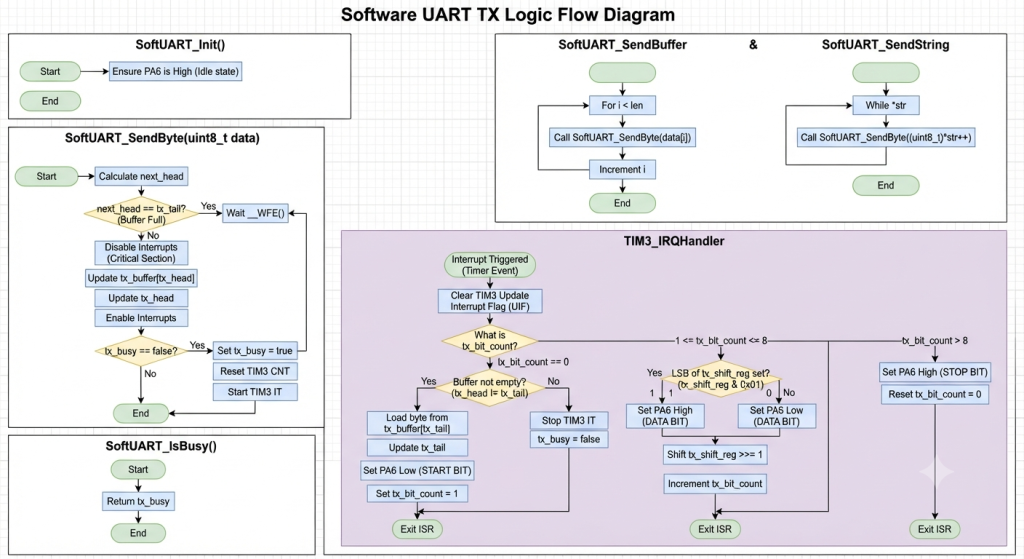
แผนผังการทำงาน (Flowchart) เพื่อช่วยให้เข้าใจการทำงานได้ชัดเจนยิ่งขึ้น
Source File ทั้งหมดของ soft_uart.c
/* soft_uart.c — Software UART via TIM3 Interrupt */

#include "soft_uart.h"
#include "main.h"

/* ===================== Private Variables ===================== */

static volatile uint8_t  tx_buffer[SOFT_UART_TX_BUF_SIZE];
static volatile uint16_t tx_head = 0;  /* Where new data is added */
static volatile uint16_t tx_tail = 0;  /* What the ISR is currently sending */

static volatile uint8_t  tx_shift_reg = 0;
static volatile uint8_t  tx_bit_count = 0;
static volatile bool     tx_busy = false;

/* ===================== Initialization ===================== */

void SoftUART_Init(void)
{
    /* Ensure PA6 is High (Idle state) */
    HAL_GPIO_WritePin(soft_tx_GPIO_Port, soft_tx_Pin, GPIO_PIN_SET);
}

/* ===================== Core TX Logic ===================== */

void SoftUART_SendByte(uint8_t data)
{
    /* Calculate next head index */
    uint16_t next_head = (tx_head + 1U) % SOFT_UART_TX_BUF_SIZE;

    /* Wait if buffer is full */
    while (next_head == tx_tail) { __WFE(); }

    /* Disable interrupt temporarily to safely update the buffer */
    __disable_irq();
    tx_buffer[tx_head] = data;
    tx_head = next_head;
    __enable_irq();

    /* Start the timer if it's not already running */
    if (!tx_busy)
    {
        tx_busy = true;
        htim3.Instance->CNT = 0;
        HAL_TIM_Base_Start_IT(&htim3);
    }
}

void SoftUART_SendBuffer(const uint8_t *data, uint32_t len)
{
    for (uint32_t i = 0; i < len; i++)
    {
        SoftUART_SendByte(data[i]);
    }
}

void SoftUART_SendString(const char *str)
{
    while (*str)
    {
        SoftUART_SendByte((uint8_t)*str++);
    }
}

bool SoftUART_IsBusy(void)
{
    return tx_busy;
}

/* ===================== Interrupt Handler ===================== */

/* Put this function in your stm32f4xx_it.c file,
   or keep it here if you are not using CubeMX's IT file.
   It MUST be named exactly TIM3_IRQHandler. */

void TIM3_IRQHandler(void)
{
    /* Clear the update interrupt flag manually (bypass HAL overhead) */
    TIM3->SR = ~TIM_SR_UIF;

    if (tx_bit_count == 0)
    {
        /* Load next byte from the ring buffer */
        if (tx_head != tx_tail)
        {
            tx_shift_reg = tx_buffer[tx_tail];
            tx_tail = (tx_tail + 1U) % SOFT_UART_TX_BUF_SIZE;

            /* Send Start Bit (Low) */
            HAL_GPIO_WritePin(soft_tx_GPIO_Port, soft_tx_Pin, GPIO_PIN_RESET);

            tx_bit_count = 1; /* Start processing data bits on next interrupt */
        }
        else
        {
            /* Buffer empty: Stop the timer */
            HAL_TIM_Base_Stop_IT(&htim3);
            tx_busy = false;
        }
    }
    else if (tx_bit_count <= 8)
    {
        /* Send Data Bits (LSB first) */
        if (tx_shift_reg & 0x01U)
        {
            HAL_GPIO_WritePin(soft_tx_GPIO_Port, soft_tx_Pin, GPIO_PIN_SET);
        }
        else
        {
            HAL_GPIO_WritePin(soft_tx_GPIO_Port, soft_tx_Pin, GPIO_PIN_RESET);
        }

        tx_shift_reg >>= 1;
        tx_bit_count++;
    }
    else
    {
        /* Send Stop Bit (High) */
        HAL_GPIO_WritePin(soft_tx_GPIO_Port, soft_tx_Pin, GPIO_PIN_SET);
        tx_bit_count = 0; /* Reset for next byte */
    }
}
Main.c
Code หลักของโปรแกรม ให้เปิด Source File ที่ชื่อ main.c
เริ่มต้นด้วยการ Include Header File ที่จำเป็นดังนี้
#include "soft_uart.h"
#include "stdio.h"
ภายในส่วน User Code Begin ให้ประกาศตัวแปร PV (Private Variable) ดังต่อไปนี้:
uint8_t buffer[SOFT_UART_TX_BUF_SIZE]={0};
uint8_t counter=0;
ในฟังก์ชัน main ให้เรียกใช้ SoftUART_Init() เพื่อเริ่มต้นการทำงานของ Soft UART ในส่วน User Code Begin 2:
SoftUART_Init();ในส่วน User Code Begin 3 ภายใน while (1) loop:
uint16_t len=snprintf(buffer,SOFT_UART_TX_BUF_SIZE, "counter value = %d \r\n", counter ++);


SoftUART_SendBuffer(buffer,len);
while(SoftUART_IsBusy());


HAL_Delay(10);
เราจะสร้าง Buffer ด้วยฟังก์ชัน snprintf พร้อมเพิ่มค่าของ Counter จากนั้นส่งข้อมูลใน Buffer ทุก ๆ 10 ms
เมื่อขั้นตอนทั้งหมดเสร็จเรียบร้อยแล้ว ให้ Save และ Build Project จากนั้นรันโปรเจกต์ตามขั้นตอนตามรูปข้างล่างนี้

2. ผลการทำงาน (Results)
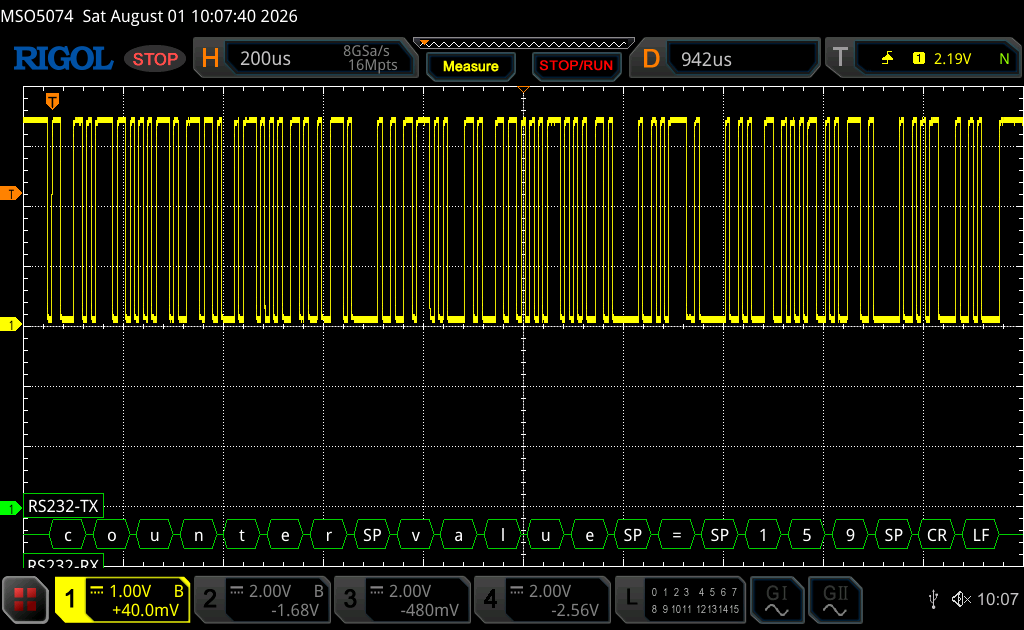
เมื่อทำการวัดสัญญาณที่ขา PA6 จะได้ผลลัพธ์ดังต่อไปนี้
สรุป
เราสามารถส่งข้อมูลได้สำเร็จด้วย Software UART ที่พัฒนาขึ้น โดยใช้ TIM3 Interrupt ในการควบคุมจังหวะการส่งแต่ละบิต และส่งข้อมูลออกทางขา TX ได้ตาม Baud Rate ที่กำหนด
จากขั้นตอนทั้งหมดนี้ เราได้เห็นการทำงานของ Software UART ตั้งแต่การจัดการ TX Buffer การส่งข้อมูลทีละ Byte ไปจนถึงการควบคุมจังหวะการส่งด้วย Timer Interrupt ซึ่งเป็นพื้นฐานสำคัญของการ Emulate UART ด้วยซอฟต์แวร์
และหวังว่าบทความนี้จะช่วยให้การใช้ Software ส่งข้อมูล UART ได้ง่ายขึ้น
Source : Emulating UART Part 2: Sending Data
Download code : GITHUB
Translated and edited by Bunpajarn
STM32 | UART | TIM3 |